Carnivore Popcorn

Somebody asked me a while back what they could do for popcorn. My friend, I have found it!

You’re going to have to do a little footwork to procure the materials if you don’t buy your beef in bulk the way I do. If you do, tell your butcher you want the trim fat. And the suet and the marrow bones, and the organs! Don’t waste food! But this is about the trimmings. If you don’t buy your animals in bulk, you can probably go to any butcher and ask for fat trimmings. I promise, they will not think you’re crazy. Just march right up to that counter and ask!

When I got my first big ugly bag of fat with a bunch of red meat still stuck to it, I momentarily thought “What in the world am I going to do with this? Why did I ask for this?” I like suet for rendering, as it gets you a nice clean tallow, but this? This has a lot of meat still on it!

Um, hey…Carnivore person? It’s A BUNCH OF FAT WITH A LITTLE BIT OF MEAT ON IT! Isn’t that what you prefer to eat?

So I diced it up into about 1/4 inch pieces

And I fried it and ate it with my pitifully lean steak. (If you are one of those blessed people who have an air fryer, this would be a good use for it!)

You don’t need to eat this stuff as a side. It would make a marvelous small meal (aka, a snack).

You will never miss popcorn again, I promise. Just try it.

Steak Crisps

I wouldn’t want to name them ‘beef chips’.

The thing I miss the most about eating carbs is crispy textures. I love potato chips, crackers, crisp cookies. I don’t love what those things do to my body, though, so I’ve stayed away for years. You can buy crispy carnivore snacks, but I can’t afford that stuff.

What I’ve taken to doing is as simple as can be, and not at all expensive if you can find these on sale. My favorite local grocery store frequently sells the steak-um style beef sheets for 2 for $5.

This is not even a recipe, it’s so simple.

  1. Lay your sheets out in the food dehydrator on the wire racks. I put one of the plastic fruit-leather pans on the bottom rack to catch any drips of fat. Do remove the paper that separates the meat-sheets. I left them on once, and the food stuck to it. Very disappointing.
  2. Salt or season to taste. I usually use plain Redmond’s Real Salt. The smoked salt was delicious, but sprinkle very lightly. The bigger crystals will overwhelm the flavor.
  3. Dry at around 160°F for 12 hours.

Eat them right away or bag them up for later. I keep them in the fridge. It doesn’t take us long to eat them all, so I’m not sure how shelf-stable or travelable they are.

Doggies will want some. Don’t be stingy:

How To Render Your Own Tallow or Lard

It occurs to me that, if you’re going to make my pemmican recipe, you might also want to know how to render your own beef tallow. The instructions for lard and tallow are basically the same, so this is also how you get good, old-fashioned lard for cooking. We really need to up our fat game if we’re going to be healthy in our current food environment, so let’s get cracklin! (SWIDT?)

Like most things I do, rendering fat is super easy.

You can buy tallow and lard already rendered, of course, but to get clean lard that hasn’t been partially hydrogenated can be very expensive. You definitely don’t want what’s on the shelf at the grocery store, unless they have Epic or similar brands. Those are so expensive, I only do that if I have no other choice. If you want to have good animal fat, but you need to be frugal, you have to go local (lots of small farms render and sell lard or tallow) or do it yourself. Being a cheapskate, I nearly always do it for myself.

The first step to rendering fat is getting some raw fat. For the best quality tallow, you need suet. For lard, you want leaf fat. These are the fats from around the kidneys of the animal, and are the purest source of fat. I do sometimes just buy plain old fatback (not salt pork!) and use that instead, and it honestly renders out fine. It’s good enough for the likes of us, anyway. But leaf fat will need no trimming and give you no porky odor in your lard, whereas fatback does sometimes have a slight scent to it when it’s rendered out. Fatback costs less, though, so I do that pretty frequently. Nobody has ever complained.

Leaf fat also gives the best cracklins you’ll ever have. This is something to consider, believe me.

Now that you’ve found some fat, chop it up!

With beef suet, I’ve found that simply chopping it while still frozen breaks it down small enough that you don’t need to do anything further. It practically shatters. For pork fat, cube it with a knife, then put it in the food processor for a few seconds to break it down even further. Or just keep chopping with the knife until it’s tiny and you’re feeling like a greased pig yourself. Whatever you like. (Update: I’ve been told you can skip this step if you’re in a rush. I doubt you’ll get the same delicious crackling or get as much fat rendered out that way, but go ahead if you don’t want to chop!)

Cook it. After the fat is chopped, it goes into the slow cooker on low for several hours. Sorry to be so vague about timing, but it really depends on your fat and your cooker. I’ve had it go for as little as four hours to as long as seven. When the unrenderable portion of the suet or leaf fat has risen back to the top and turned brown, you’re done.

Scoop the solids out into a fine mesh strainer and squeeze the liquid fat back into the crock with a spoon. If you want to eat the cracklins (and honey, you do), salt them and enjoy them after they’ve cooled enough to leave the skin on your tongue. If they’re not quite brown enough yet, you can fry them a little bit more. You won’t be able to eat it all, so invite children to the feast.

Mmmmm, cracklins!

Strain. Place a sieve or a strainer over a stainless steel bowl, and line it with paper towels–I find the cheap Sparkle brand has a great lint-free flow–and carefully pour the hot fat through it. If there are any solid bits left, repeat this step. The finer your sieve and the better your paper towels, the fewer times you have to do this. I usually need to double strain it.

You get a beautiful golden liquid that turns white when it solidifies. Keep it in a glass or metal jar (not plastic, please, for your health’s sake), either out of direct light in a cupboard or in the refrigerator.

Clean up. I use paper towels to wipe as much fat as possible off of my knives, food processor parts, crock pot and bowls. I do not want that amount of fat going down my drain and clogging it up. You don’t either. When you switch to a heavily fatty-meat-based diet, you will want to be careful with your waste, or face plumbing problems.

Now you can cook with your rendered fat, or make pemmican, or rub it on your dry skin, or make soap and candles–sky’s the limit, y’all! Have fun!

Questions or comments? Discuss it with me on Gab, MeWe, or Social Galactic.


Pemmican

How to make on-the-go carnivore nutrition:

(Pemmican) was invented by the native peoples of North America. It was widely adopted as a high-energy food by Europeans involved in the fur trade and later by Arctic and Antarctic explorers, such as Sir Ernest Henry Shackleton, Robert Falcon Scott and Roald Amundsen.

The specific ingredients used were usually whatever was available; the meat was often bison, moose, elk, or deer. Fruits such as cranberries and saskatoon berries were sometimes added. Cherries, currants, chokeberries and blueberries were also used, but almost exclusively in ceremonial and wedding pemmican.

Read more about pemmican on Infogalactic

Recipe first. Scroll on past for images and explanations.

Pemmican

A nutrition bar with a 1:1 ratio of meat to fat
Prep Time1 hour
Cook Time8 hours
1 hour
Total Time10 hours
Keyword: Emergency, survival, travel
Servings: 8 bars
Author: GAHCindy

Equipment

  • Food dehydrator (or the sun, or a fire)
  • Food processor (or rocks)
  • Meat slicer (or sharp stone knife)
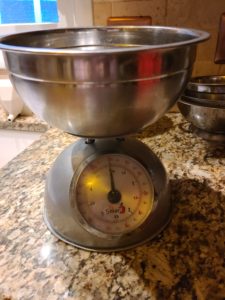
  • Kitchen scales (or two hands and two eyeballs for estimating)

Ingredients

  • 5 lb beef hearts Other lean meat may be used, but hearts are best.
  • 1 lb rendered beef tallow

Instructions

  • Slice beef hearts very thin using either a meat slicer (recommended) or a very sharp knife. Slightly frozen meat slices much more easily.
  • Lay slices out on food dehydrator sheets in a single layer.
  • Dehydrate for 6-8 hours at 167 degrees. Meat is done when it snaps nicely in two.
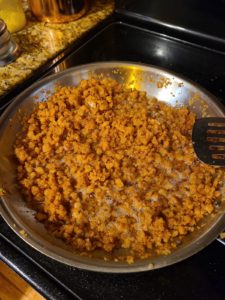
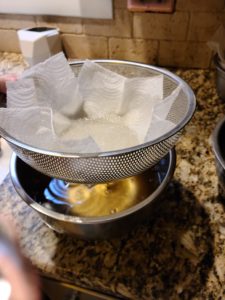
  • Using a food processor, grind the dried meat to a powder. Don't leave large pieces, as it makes the texture of the bar much less enjoyable. This takes a while, and it's loud, so cover your ears.
  • It's a good idea to get as close to a 50/50 blend of meat and fat as possible for the sake of shelf-life and flavor. Make note of the weight of both the bowl you will mix the meat in, and the saucepan in which you will melt down the beef tallow, so that you can zero out those amounts when you weigh your meat powder and tallow.
  • Add the tallow to the pan and melt it down.
  • Weigh the meat powder to determine how much fat to use. 5 lbs of meat will usually dry out to about 1 lb of powder. Then weigh out the same amount of fat and mix the two together.
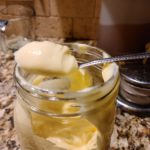
  • At this point, you can flavor your pemmican if you like. Suggested additions: 1/4 cup honey, freezedried blueberries, berry powder.
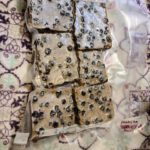
  • Pour into a baking dish. I usually use a 9x13 for this amount, but you can do whatever thickness you like.
  • This will set right on the counter, or you can put it in the fridge for a few minutes to go faster. After it's set, cut it into the desired number of pieces.
  • Store individually wrapped in plastic wrap or baggies, or for longer shelf-life, in vacuum-sealed bags.

One of the toughest things about maintaining a carnivore diet while traveling is finding food that is just meat. No seed oils, no plants? No food! I often find myself fasting when I don’t really want to, just because there’s not much out there. Yes, you can buy some McDonald’s hamburger patties in a pinch, but I hate the drive-thru, and the rest of my family doesn’t need whatever else is on that God-forsaken menu. This Feather-Indian food is a perfect emergency and travel food, and I try to keep some on hand at all times.

It’s a little bit time consuming to make, and you need some special equipment if you don’t want to spend days making it the old-fashioned way. If you do want to make it the old fashioned way, please do take pictures and send them my way. That would be not much fun at all for me, but I’d love to see it done!

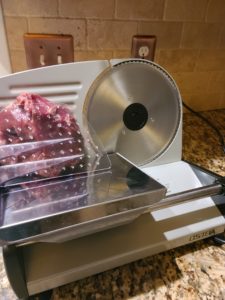
I wouldn’t do this without a good meat slicer


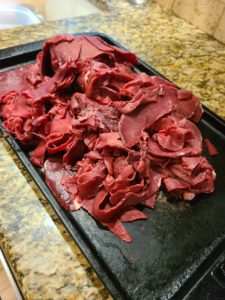
Sliced meat, ready for drying.

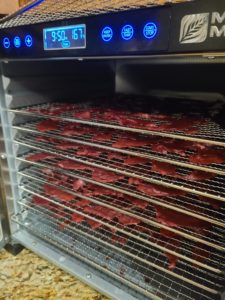
Lay your beef slices in a single layer and cook ’em!

Pemmican can be cooked into a stew or fried with vegetables for the picky, but I’ve never been motivated or hungry enough to try that. We eat it as a bar. It looks a bit like a brownie, but doesn’t resemble dessert in any other way.

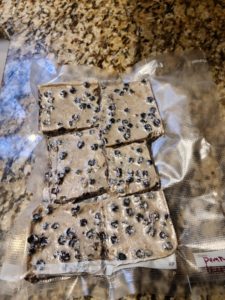
This pemmican has freeze dried blueberries sprinkled on top. Not terribly sweet, and still carnivore enough for me.


A few tips and warning before you get started:

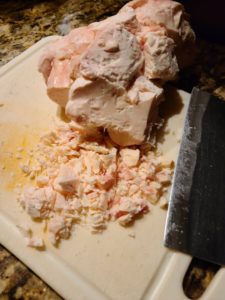
Trim: Trim all of the fat you can from around the heart. The red, lean meat is all you want for this part. You’ll add back an equal weight of tallow, and you want the fat:protein to be as close to 50/50 as possible.

Grind! I’ve gotten pretty precise in the way I make my pemmican. My first batch wasn’t very good, to be honest. It was unpleasant to chew, and inconsistently textured. I needed to be pickier about my grind size. You need powder, not just tiny chunks. Be patient and keep grinding the dried meat no matter how long it takes, until you have actual powder.

Sweeten: You can add honey or dried fruits to this and increase both calorie count and carbs. These additions also make it much more palatable. This is survival and on-the-go food, so I don’t worry too much about the carbs, but if you’re trying to lose weight or defeat a carb addiction, leave that stuff out and just salt it when you eat it.

Preserve: Interestingly, while honey is an additional preservative, salt will make your pemmican go bad faster. Wait, wut? It’s true! Salt will draw moisture into your pemmican and shorten its shelf-life considerably. If you feel it needs flavor, add it at the point of consumption, not in the making.

Meat: Any lean meat can be used, even ground beef. If you don’t feel like slicing meat, or only have access to ground meat, 93% or leaner ground beef can be used. I’ve done it, and it tastes pretty good, but not exactly the same. If your meat is not lean enough, you will not have a very tasty or shelf-stable result. Follow all the same instructions as for sliced meat, except use a rolling pin to roll your ground meat between two sheets of parchment, thusly:

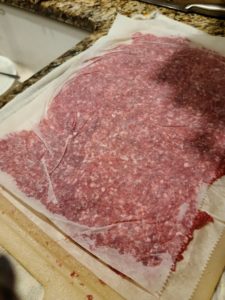
Then cut it into roughly 3 inch strips and follow the rest of the instructions.

Fat: You want tallow from a ruminant animal like beef or bison, so you have a high saturated fat content and room-temperature solidity. Lard and higher PUFA fats will not do the same thing. They’d taste awful, too, I’m sure. I imagine lamb tallow would also work. Is lamb tallow a thing?


Have you ever tried pemmican? Made it? Let me know how you do it, or if you ever even want to, by joining me on Gab, MeWe, or Social Galactic.

Homemade CLEAN Mayo

Do you hate it as much as I do when a blogger posts seventeen paragraphs of text before giving you the recipe? Here ya go. Scroll on down for the blog post, if you care for it:

Clean Keto Mayonnaise

A healthy mayo that uses no seed oils or sugar
Prep Time5 minutes
Course: Condiment
Keyword: keto

Equipment

  • Immersion blender

Ingredients

Instructions

  • Add all ingredients except coconut oil to a wide mouthed glass jar (or whatever you'd like to store your mayo in).
  • Slowly drizzle the coconut oil into the rest of the ingredients as you blend with your immersion blender.

Notes

This recipe doubles easily. 
You can add any number of herbs and spices to this to punch it up even more. 

Anybody can make mayonnaise, and from almost any oil. It’s not even hard, so why doesn’t everybody do it? Well, the devil is in the details. With most mayos, you have to choose two of the following three things: healthy fat, great taste, pleasant mouthfeel. You’ll be glad to hear that I’ve exorcised this particular demon for you, so you can now have the best possible mayonnaise, without compromising your health.

Most any mayo you find in the grocery store, even the ones that tout their use of healthy fruit oils like olive or avocado, still use canola or soybean oil as their base. You can get a few clean brands (Primal Kitchen is pretty good), but they cost so much it’s hard to stomach the purchase. They also don’t taste as good as this mayo does, in my opinion.

There’s a good reason for the use of seed oils in mainstream mayonnaises, beyond their cheapness. It is just really hard to emulsify animal fats into a properly textured mayonnaise. Olive oil has a whang to it that makes it less than desirable for that particular application, and avocado oil is even more expensive. Also, a lot of people are allergic to avocados.

A lot of carnivores love bacon grease mayo. I don’t care for either the taste or the texture. Some use lard, barely melted on the stove, but I don’t like the texture of that, either. Good coconut oil is too solid for the job.

But we really like our mayonnaise around here. So what to do?

I have found just one product that I can both afford and that gives the flavor and mouthfeel of the very best mayonnaise. It’s a liquid coconut oil from Carrington Farms. (I don’t receive any compensation from my links. I just like the product.) One bottle, costing less than $12 gives me about 4 cups of mayonnaise, which makes it a sight less expensive than the paleo-type mayo that you find in the store for $12 a pint. I also use Chosen Foods Avocado Oil. Just make sure you’re buying a brand that’s 100% avocado oil.

I can’t personally consume the coconut oil kind because coconut oil taken internally gives me a rash, but Get Along Husband and the kids love it. The avocado oil is perfect for everybody. I hope you enjoy it, too!