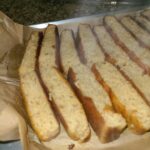
Dairy-Free Cloud Bread

Every low carb eater has a cloud-bread recipe. I don’t claim any originality or superiority for this one. They all turn out basically the same, to be honest. This recipe makes a bigger batch for a bigger family (or just a bigger appetite). Most people use cream cheese, but we have to work around dairy sensitivities, so this a dairy-free version.

Dairy-free Cloud Bread

A light bread substitute for the carb-conscious
Prep Time5 minutes
Cook Time15 minutes
Servings: 8

Equipment

  • hand mixer
  • parchment or silicone mats

Ingredients

  • 8 eggs separated
  • 8 Tbs mayonnaise
  • 1/2 tsp cream of tartar
  • 1 pinch salt
  • 1/8 tsp garlic powder (optional)

Instructions

  • Heat the oven to 325°
  • Using an electric mixer, beat egg whites and cream of tartar in a large bowl until stiff. It is important to use clean beaters. The whites won't stiffen if you contaminate them with other ingredients, so don't neglect to do this step first.
  • Mix the rest of the ingredients in a separate large bowl.
  • Spoon about 1/4 of the egg white foam into the yolk mixture, then gently fold (do not beat!) in until the mixture is homogenous. Repeat until all of the white is blended with the yolk.
  • Drop 1/4 cup dollops of the batter onto cookie sheets, lined with parchment paper. I usually need three pans for this amount of batter.
  • Bake for 15 minutes, or until set and golden brown.

I sometimes miss sandwiches, and find that this bread does a pretty good job filling in for the bread. It’s not 100% carnivore, but I make occasional allowances for avocado or coconut oils. If you do carnivore with dairy, substitute cream cheese for the mayo, and you can stay purely carnivore. If you do it without dairy, I’d bet bacon grease would do the trick. Omit the salt if you’re going to do that. I may try this and get back to you.

I recently made egg breakfast sandwiches with mayonnaise. Egg and mayo on egg and mayo. It works, okay?

Picnic!


Carnivore Pizza

Mmmmm, bready!

I’m a simple woman. I’m happy to just grill up a steak or some burgers and call it a meal. No need to get fussy making messes in the kitchen.

Get Along Husband, however, likes his comfort foods, and so do the kids. One thing they all miss like crazy since we changed our eating habits is pizza with a bread crust. People make something called meatza all the time using ground meats and cheese, but it’s not very bready, and not worth the effort, in my opinion. This stuff passes for bread, though, and is so easy to do that I can make it happen even on a weeknight.

Carnivore Pizza Crust

An easy, convincing substitute for pizza crust
Prep Time10 minutes
Cook Time20 minutes
Course: Main Course
Cuisine: Carnivore
Keyword: carnivore, keto, low carb
Servings: 4

Equipment

  • parchment paper or silicone mats
  • 1 plastic food prep glove

Ingredients

  • 6 oz pork rinds
  • 6 eggs
  • 1 tsp baking powder
  • 1/2 tsp garlic powder optional
  • 1/2 tsp rosemary optional
  • 2 tbsp parmesan cheese, grated optional

Instructions

  • Heat oven to 325℉
  • Crush the pork rinds in a blender (or by hand, if that's how you roll).
  • Add baking powder and other (optional) ingredients.
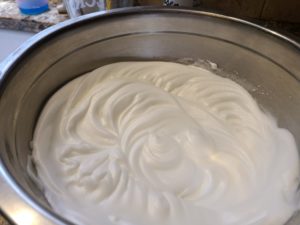
  • Whisk the eggs together in a separate bowl, then mix thoroughly into the pork rinds.
  • Set aside for 3 minutes to soak.
  • Spread the pork rind mixture onto a parchment-lined baking sheet. A silicone mat will work, as well.
  • Bake for about 15 minutes, or until beginning to turn golden brown around the edges.
  • Remove crust from oven, then top with desired toppings.
  • Heat oven to 425℉
  • Place pizza back into oven for 5 minutes, or until cheese has melted and toppings are warm.

Notes

  • To increase the number of servings, use one ounce of pork rinds for every egg, and adjust for whatever size crowd you're trying to feed.
  • I find that a plastic-gloved (like these) hand pats the dough out more easily than trying to spread it with a spatula, but a spatula will do in a pinch.

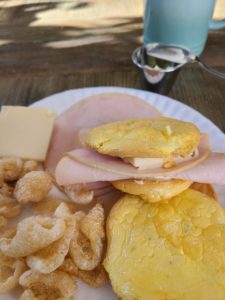
You can top this any way you want. To keep it strictly carnivore and keto, I made a super-simple alfredo sauce by warming up a cup of heavy whipping cream and maybe 1/4 cup of parmesan cheese. You can add seasonings like basil, garlic, and onion to make it a little more zesty. The meat on top of this one is canned chicken, nothing fancy, and little balls of fresh mozzarella.

Of course, I’ve made this for the whole family with non-meat toppings and tomato pizza sauce. Everybody enjoys it!

Yes, that’s pineapple, and I’m not even ashamed of myself!

How bready is it? Pretty bready. I love it.

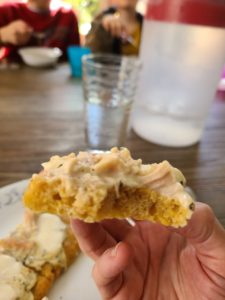
You could just make the bread and put a little extra cheese on top, dip it in garlic butter, and you have a delicious garlic bread. No toppings required. And if you want to put the batter about an inch deep into some greased muffin tins, the pork rind and egg mixture would make a fine “biscuit” for biscuits and sausage gravy (which I am totally doing for Sunday breakfast this weekend). This batter/dough is really versatile.

So if you’re thinking you can’t cut the carbs because you’d miss bread too much, try this. You don’t even have to be a cook.

Update:

I found this marvelous stuff at Wal-Mart (I know, I hate them, too).

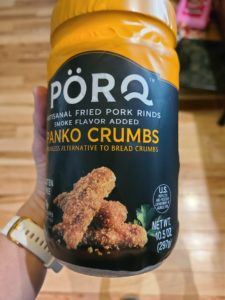
You can use this instead of having to crush your own pork rinds. It’s 10.5 oz, so if you use the whole can, you’ll need 11 eggs and 1.5 teaspoons of baking powder. It comes out to two medium-sized pizzas. And it costs less to buy it this way than to buy whole bags and crush them yourself. Yay!


Carnbread Dressing

This diet just gets weirder and weirder.

I showed you earlier how to make a cornbread simulation I like to call Carnbread. Now let’s turn that oddly bread-like loaf into a stuffing for your Thanksgiving turkey! Or maybe your Thursday night chicken dinner, since this is January.

Carnbread stuffing is made in a similar manner to cornbread stuffing.

Carnbread Dressing

A meaty alternative to cornbread stuffing
Prep Time10 minutes
Cook Time30 minutes
Course: Side Dish
Cuisine: Carnivore
Keyword: carnivore, dairy free, keto
Servings: 10

Ingredients

  • 2 loaves carnbread
  • 2 tbsp dried sage
  • 2 tbsp dried minced onions a teaspoon of onion powder could also be used
  • 2 tbsp paprika
  • 2 tbsp dried parsley
  • 2 tsp salt
  • 1 tsp rosemary
  • 1 tsp celery seed
  • 2 tsp thyme
  • 1/4 tsp white pepper
  • 1/4 tsp black pepper

Instructions

  • Prepare one recipe of Carnivore Cornbread.
  • Optional, but helpful for a better texture: Freeze the bread overnight or longer, wrapped in plastic wrap or zipper bags, then allow to thaw before continuing.
  • Heat oven to 300 °F
  • Cut Carnbread into 1-inch cubes, and toss in a large bowl with all other ingredients.
  • Spread the cubes in a single layer onto two (or more) baking sheets
  • Bake in the oven until they are crunchy and turn golden brown.
  • Stir occasionally, and taste-test to see if they're as done as you like.
  • Now you have croutons! Stop here if you just want to snack on some croutons, or eat them with egg drop soup or something.
  • To make the dressing, mix the now-crispy croutons with two cups of warm poultry stock.

Stuffing (or dressing, I guess, since I never put it inside the bird) is my favorite part of the Thanksgiving meal. It was, anyway, before I figured out what all that delicious food was doing to my body. Good news, carnivores: we don’t have to miss out on the stuffing experience! This stuff is so close to bread stuffing that I think I could have served it without explanation on Thanksgiving and nobody would have figured out that it’s not made of bread. They wouldn’t have thought it was normal bread, to be sure. The texture isn’t exactly right, so maybe they’d have guessed it was one of those Ezekiel breads or gluten-free breads.

As with any carnivore recipe, you can and should leave out any and all spices that you don’t eat. On special occasions, I go ahead and use the spices I normally skip. I served this dish right alongside my bread stuffing. Guess which one people preferred? This dressing is really good! I don’t know if I would actually put it inside a turkey and bake it. That would probably be soggy and eggy-tasting. Let me know if you decide to try it. I’m not that brave.

Carnivore Cornbread

AKA Carnbread

Recipe first. We’ll talk later.

Carnivore Cornbread

A fairly bready substitute for cornbread
Prep Time5 minutes
Cook Time40 minutes
Servings: 10

Equipment

  • 2 loaf pans
  • 1 blender

Ingredients

  • butter, bacon grease, or lard for greasing pans
  • 3 12.5 oz cans canned, cooked chicken, well-drained Sub your own pre-cooked chicken if you like.
  • 14 large eggs
  • 1 tsp baking soda
  • 1 tsp cream of tartar
  • 1 tsp salt I use Redmond's Real salt. If you use regular table salt, you may want to halve the amount.
  • 4 tbsp unsalted butter
  • 1/2 tsp crushed dried rosemary (Optional, helps with the eggy flavor)
  • or 2 Tbsp Lakanto monkfruit or other keto-friendly sweetener (Optional, for a sweet version. Omit rosemary if choosing this option.)

Instructions

  • Heat oven to 350°F.
  • Grease the two loaf pans. If the pans are cast iron, put them into the pre-heating oven to warm up.
  • Blend the drained chicken and eggs in a blender until thoroughly mixed.
  • Divide the batter into the loaf pans.
  • Bake for about 50 minutes, or until the "bread" has completely set.
  • Turn out immediately onto a cooling rack to cool.

I don’t do a lot of food substitutes. If I can’t eat a thing, I don’t often try to make something similar to fill that niche in my diet. However, there are occasions–Thanksgiving, Christmas, days-ending-in-y-when-I’m-tired-of-the-same-old-same-old–when a little bready substance seems like it would hit the spot. This recipe evolved from several carnivore recipes I’ve found online that weren’t big enough–or tasty enough, frankly–to feed my large family. I used this recipe recently to make croutons which then became a carnivore “stuffing” to go with our Thanksgiving turkey. The recipe for that is coming soon. Everybody said that my version was just as good as the gluten-free bread version I made for the normal people, and it disappeared just as fast, so I guess they were telling the truth!

A word of warning for the unwary: a slice of real bread has nothing like the nutrient profile of a slice of this fake bread bread simulation. So when you’re eating carnbread (as I just decided to rename it), it is not going to serve the same function as cornbread. You’ll fill up very quickly on this loaf. I ate a few slices last night as my main course, simply buttered and dipped in a delicious meat stock. It was a very satisfying meal.

I’ve poured the batter into individual-size casserole dishes that made loaves just the right size for a hamburger bun, and that works beautifully for a cookout where you’d like to be able to eat a sandwich just like everybody else. Goes great with my homemade clean mayo. You might not be able to eat the whole sandwich, though. It is a lot of food.

You could also use a couple of well-greased muffin tins to make cornbread muffins. Just watch the cooking times as you change the shape and size.

I haven’t actually tried sweetening the bread for a dessert-like treat yet, but I have it in my head to do a maple and vanilla flavored one sometime. Since it doesn’t taste very chickeny, but is a little eggy, I think it will be pretty tasty. I’ll report back on that if I ever do it. In the meantime, I hope you enjoy this recipe!

Let me know via Gab, MeWe, or SG if you try it. Or if you refuse to try it. Whatever, just come talk to me!


Steak Crisps

I wouldn’t want to name them ‘beef chips’.

The thing I miss the most about eating carbs is crispy textures. I love potato chips, crackers, crisp cookies. I don’t love what those things do to my body, though, so I’ve stayed away for years. You can buy crispy carnivore snacks, but I can’t afford that stuff.

What I’ve taken to doing is as simple as can be, and not at all expensive if you can find these on sale. My favorite local grocery store frequently sells the steak-um style beef sheets for 2 for $5.

This is not even a recipe, it’s so simple.

  1. Lay your sheets out in the food dehydrator on the wire racks. I put one of the plastic fruit-leather pans on the bottom rack to catch any drips of fat. Do remove the paper that separates the meat-sheets. I left them on once, and the food stuck to it. Very disappointing.
  2. Salt or season to taste. I usually use plain Redmond’s Real Salt. The smoked salt was delicious, but sprinkle very lightly. The bigger crystals will overwhelm the flavor.
  3. Dry at around 160°F for 12 hours.

Eat them right away or bag them up for later. I keep them in the fridge. It doesn’t take us long to eat them all, so I’m not sure how shelf-stable or travelable they are.

Doggies will want some. Don’t be stingy:

Carnivore Waffles and Keto Maple-flavored Syrup

You know, for kids!

As usual, recipe up front, babbling about it below:

Carnivore Waffles

100% Animal-based waffles
Prep Time5 minutes
Cook Time20 minutes
Course: Breakfast
Cuisine: Carnivore
Keyword: carnivore, keto, low carb
Servings: 8

Equipment

  • waffle maker
  • blender

Ingredients

  • 10 eggs
  • 1 lbs breakfast sausage Other ground meats could be substituted for different tastes/textures
  • 2 tsp beef gelatin Optional. Improves texture

Instructions

  • Blend eggs and sausage together until the mixture is a smooth batter.
  • Cook, 1/2 cup at a time, in a waffle maker on its highest setting.
  • Remove finished waffles to an oven on 200˚ F to keep warm until ready to serve.

Notes

This recipe easily doubles and triples to feed a crowd. 

Keto Maple-flavored Syrup

A low-carb syrup
Prep Time1 minute
Cook Time5 minutes
Course: Breakfast
Keyword: keto, low carb, sugar-free
Servings: 8

Ingredients

  • 1 tsp xanthan gum
  • 1/4 cup water
  • 2 cups water
  • 2/3 cups erythritol/stevia granulated sweetener (I prefer the Pyure brand) or your preferred low-carb sweetener
  • 1 tbsp maple extract other extracts, such as vanilla, may be used as well
  • 1 pinch salt

Instructions

  • Whisk xanthan gum into 1/4 cup water and set aside.
  • Whisk sweetener and salt into 2 cups water in a small saucepan.
  • Heat syrup mixture until sweetener is dissolved, then remove from heat.
  • Whisk in maple or other flavorings and xanthan gum mixture.

Notes

This recipe doubles and triples easily to feed a crowd.

Somebody was asking me the other day (as they frequently do) what my kids are eating. I don’t hold them to a carnivore, or even a keto regime, but I’m not putting any more sugar in their lives than is good for them, either. We don’t want a blood sugar spike and drop to start our day off with a case of the grumpies. I give them their starches later in the day when their bodies are better able to use the sugars. (Update: I have since writing this taken my whole family heavily meat-based keto. The sugar isn’t happening around here anymore.)

I make these waffles on special occasions, or just the odd laid-back Saturday. Carb addicts and strict carnivores will want to skip the syrup and just eat these waffles as a bread. I like to spread them absolutely slather them with butter, or maybe add some diced ham to the batter for extra flavor and protein. It’s a really forgiving recipe to play with. Enjoy!


Carnivore Chips

Also a nice dog treat.


Share with puppeh!

I found some uncured turkey bacon with clean ingredients (no weird poly-or-di-anything) for a really great price, so I took it home with me, knowing full well that turkey bacon doesn’t fit anywhere into my regular diet. It’s…well, it’s just not bacon, OK? So, after it sat in my fridge for a while, wondering why I had forsaken it, it had an idea. “Hey, Cindy!” it called to me, “Let’s see if I can be a tasty chip!”

So I did what I was told, and the turkey strips attained their true calling as turkey chips.

This is hardly even a recipe. Just snip the bacon into two-inch pieces, and dehydrate on 167° for about 8 hours. You could probably go faster on 200° in an oven, but I didn’t try that, so who knows?

The taste is OK. It’s still obviously turkey bacon, but it could be a useful transporter of dip from bowl to mouth. You could use this with melted cheese, or liver paté, or even whatever dip you non-carnivores like. The main thing is that it’s crispy and chippy, and I like crispy, chippy things.


How To Render Your Own Tallow or Lard

It occurs to me that, if you’re going to make my pemmican recipe, you might also want to know how to render your own beef tallow. The instructions for lard and tallow are basically the same, so this is also how you get good, old-fashioned lard for cooking. We really need to up our fat game if we’re going to be healthy in our current food environment, so let’s get cracklin! (SWIDT?)

Like most things I do, rendering fat is super easy.

You can buy tallow and lard already rendered, of course, but to get clean lard that hasn’t been partially hydrogenated can be very expensive. You definitely don’t want what’s on the shelf at the grocery store, unless they have Epic or similar brands. Those are so expensive, I only do that if I have no other choice. If you want to have good animal fat, but you need to be frugal, you have to go local (lots of small farms render and sell lard or tallow) or do it yourself. Being a cheapskate, I nearly always do it for myself.

The first step to rendering fat is getting some raw fat. For the best quality tallow, you need suet. For lard, you want leaf fat. These are the fats from around the kidneys of the animal, and are the purest source of fat. I do sometimes just buy plain old fatback (not salt pork!) and use that instead, and it honestly renders out fine. It’s good enough for the likes of us, anyway. But leaf fat will need no trimming and give you no porky odor in your lard, whereas fatback does sometimes have a slight scent to it when it’s rendered out. Fatback costs less, though, so I do that pretty frequently. Nobody has ever complained.

Leaf fat also gives the best cracklins you’ll ever have. This is something to consider, believe me.

Now that you’ve found some fat, chop it up!

With beef suet, I’ve found that simply chopping it while still frozen breaks it down small enough that you don’t need to do anything further. It practically shatters. For pork fat, cube it with a knife, then put it in the food processor for a few seconds to break it down even further. Or just keep chopping with the knife until it’s tiny and you’re feeling like a greased pig yourself. Whatever you like. (Update: I’ve been told you can skip this step if you’re in a rush. I doubt you’ll get the same delicious crackling or get as much fat rendered out that way, but go ahead if you don’t want to chop!)

Cook it. After the fat is chopped, it goes into the slow cooker on low for several hours. Sorry to be so vague about timing, but it really depends on your fat and your cooker. I’ve had it go for as little as four hours to as long as seven. When the unrenderable portion of the suet or leaf fat has risen back to the top and turned brown, you’re done.

Scoop the solids out into a fine mesh strainer and squeeze the liquid fat back into the crock with a spoon. If you want to eat the cracklins (and honey, you do), salt them and enjoy them after they’ve cooled enough to leave the skin on your tongue. If they’re not quite brown enough yet, you can fry them a little bit more. You won’t be able to eat it all, so invite children to the feast.

Mmmmm, cracklins!

Strain. Place a sieve or a strainer over a stainless steel bowl, and line it with paper towels–I find the cheap Sparkle brand has a great lint-free flow–and carefully pour the hot fat through it. If there are any solid bits left, repeat this step. The finer your sieve and the better your paper towels, the fewer times you have to do this. I usually need to double strain it.

You get a beautiful golden liquid that turns white when it solidifies. Keep it in a glass or metal jar (not plastic, please, for your health’s sake), either out of direct light in a cupboard or in the refrigerator.

Clean up. I use paper towels to wipe as much fat as possible off of my knives, food processor parts, crock pot and bowls. I do not want that amount of fat going down my drain and clogging it up. You don’t either. When you switch to a heavily fatty-meat-based diet, you will want to be careful with your waste, or face plumbing problems.

Now you can cook with your rendered fat, or make pemmican, or rub it on your dry skin, or make soap and candles–sky’s the limit, y’all! Have fun!

Questions or comments? Discuss it with me on Gab, MeWe, or Social Galactic.


Pemmican

How to make on-the-go carnivore nutrition:

(Pemmican) was invented by the native peoples of North America. It was widely adopted as a high-energy food by Europeans involved in the fur trade and later by Arctic and Antarctic explorers, such as Sir Ernest Henry Shackleton, Robert Falcon Scott and Roald Amundsen.

The specific ingredients used were usually whatever was available; the meat was often bison, moose, elk, or deer. Fruits such as cranberries and saskatoon berries were sometimes added. Cherries, currants, chokeberries and blueberries were also used, but almost exclusively in ceremonial and wedding pemmican.

Read more about pemmican on Infogalactic

Recipe first. Scroll on past for images and explanations.

Pemmican

A nutrition bar with a 1:1 ratio of meat to fat
Prep Time1 hour
Cook Time8 hours
1 hour
Total Time10 hours
Keyword: Emergency, survival, travel
Servings: 8 bars
Author: GAHCindy

Equipment

  • Food dehydrator (or the sun, or a fire)
  • Food processor (or rocks)
  • Meat slicer (or sharp stone knife)
  • Kitchen scales (or two hands and two eyeballs for estimating)

Ingredients

  • 5 lb beef hearts Other lean meat may be used, but hearts are best.
  • 1 lb rendered beef tallow

Instructions

  • Slice beef hearts very thin using either a meat slicer (recommended) or a very sharp knife. Slightly frozen meat slices much more easily.
  • Lay slices out on food dehydrator sheets in a single layer.
  • Dehydrate for 6-8 hours at 167 degrees. Meat is done when it snaps nicely in two.
  • Using a food processor, grind the dried meat to a powder. Don't leave large pieces, as it makes the texture of the bar much less enjoyable. This takes a while, and it's loud, so cover your ears.
  • It's a good idea to get as close to a 50/50 blend of meat and fat as possible for the sake of shelf-life and flavor. Make note of the weight of both the bowl you will mix the meat in, and the saucepan in which you will melt down the beef tallow, so that you can zero out those amounts when you weigh your meat powder and tallow.
  • Add the tallow to the pan and melt it down.
  • Weigh the meat powder to determine how much fat to use. 5 lbs of meat will usually dry out to about 1 lb of powder. Then weigh out the same amount of fat and mix the two together.
  • At this point, you can flavor your pemmican if you like. Suggested additions: 1/4 cup honey, freezedried blueberries, berry powder.
  • Pour into a baking dish. I usually use a 9x13 for this amount, but you can do whatever thickness you like.
  • This will set right on the counter, or you can put it in the fridge for a few minutes to go faster. After it's set, cut it into the desired number of pieces.
  • Store individually wrapped in plastic wrap or baggies, or for longer shelf-life, in vacuum-sealed bags.

One of the toughest things about maintaining a carnivore diet while traveling is finding food that is just meat. No seed oils, no plants? No food! I often find myself fasting when I don’t really want to, just because there’s not much out there. Yes, you can buy some McDonald’s hamburger patties in a pinch, but I hate the drive-thru, and the rest of my family doesn’t need whatever else is on that God-forsaken menu. This Feather-Indian food is a perfect emergency and travel food, and I try to keep some on hand at all times.

It’s a little bit time consuming to make, and you need some special equipment if you don’t want to spend days making it the old-fashioned way. If you do want to make it the old fashioned way, please do take pictures and send them my way. That would be not much fun at all for me, but I’d love to see it done!

I wouldn’t do this without a good meat slicer


Sliced meat, ready for drying.

Lay your beef slices in a single layer and cook ’em!

Pemmican can be cooked into a stew or fried with vegetables for the picky, but I’ve never been motivated or hungry enough to try that. We eat it as a bar. It looks a bit like a brownie, but doesn’t resemble dessert in any other way.

This pemmican has freeze dried blueberries sprinkled on top. Not terribly sweet, and still carnivore enough for me.


A few tips and warning before you get started:

Trim: Trim all of the fat you can from around the heart. The red, lean meat is all you want for this part. You’ll add back an equal weight of tallow, and you want the fat:protein to be as close to 50/50 as possible.

Grind! I’ve gotten pretty precise in the way I make my pemmican. My first batch wasn’t very good, to be honest. It was unpleasant to chew, and inconsistently textured. I needed to be pickier about my grind size. You need powder, not just tiny chunks. Be patient and keep grinding the dried meat no matter how long it takes, until you have actual powder.

Sweeten: You can add honey or dried fruits to this and increase both calorie count and carbs. These additions also make it much more palatable. This is survival and on-the-go food, so I don’t worry too much about the carbs, but if you’re trying to lose weight or defeat a carb addiction, leave that stuff out and just salt it when you eat it.

Preserve: Interestingly, while honey is an additional preservative, salt will make your pemmican go bad faster. Wait, wut? It’s true! Salt will draw moisture into your pemmican and shorten its shelf-life considerably. If you feel it needs flavor, add it at the point of consumption, not in the making.

Meat: Any lean meat can be used, even ground beef. If you don’t feel like slicing meat, or only have access to ground meat, 93% or leaner ground beef can be used. I’ve done it, and it tastes pretty good, but not exactly the same. If your meat is not lean enough, you will not have a very tasty or shelf-stable result. Follow all the same instructions as for sliced meat, except use a rolling pin to roll your ground meat between two sheets of parchment, thusly:

Then cut it into roughly 3 inch strips and follow the rest of the instructions.

Fat: You want tallow from a ruminant animal like beef or bison, so you have a high saturated fat content and room-temperature solidity. Lard and higher PUFA fats will not do the same thing. They’d taste awful, too, I’m sure. I imagine lamb tallow would also work. Is lamb tallow a thing?


Have you ever tried pemmican? Made it? Let me know how you do it, or if you ever even want to, by joining me on Gab, MeWe, or Social Galactic.

Keto Crustless Lemon Meringue Pie

You can double this recipe, or triple it, very easily, to make it into a pie large enough to share with others. For this, you would want a crust, which I haven’t included in this recipe. I’ll add a low-carb pie crust in a new post. Or you could just do a web search. There are lots of recipes out there.

keto lemon meringue

This 2-serving crustless pie ended up being consumed by me and six small people. I gave them about a third of it, a big bite each. This breakfast ended up being my only meal of the day, it was so filling. You could make this a dessert and serve four fat-adapted people instead of two, but for me it’s a treat and a meal. Do not attempt to feed this as a dessert to people who ate carbohydrates with their meal. They’ll probably die.

Keto Lemon Meringue Pie

A crustless dessert made of lemon curd and meringue
Prep Time10 minutes
Cook Time5 minutes
Cooling time3 hours
Total Time3 hours 10 minutes
Course: Dessert
Cuisine: Keto
Keyword: keto, low carb
Servings: 2
Author: GAHCindy

Ingredients

  • 6 egg yolks
  • 5 tbsp butter or ghee
  • 2 tbsp erythritol/stevia blend sweetener adjust to personal preference
  • 1 lemon, juiced and zested
  • 2 or 3 egg whites have at room temperature for best results
  • 1 tsp erythritol/stevia blend sweetener adjust to personal preference
  • 1/4 tsp cream of tartar

Instructions

  • Combine in a saucepan the egg yolks, butter or ghee, 2 T sweetener, lemon zest, and lemon juice.
  • Over medium heat, stir the mixture until it begins to thicken.
  • When the curd coats a spoon and begins to pull away from the bottom and sides of the pan with stirring, remove from heat.
  • Strain out lemon zest and lumps with a jelly strainer to leave a smooth curd.
  • Pour the curd into 2 individual ramekins or an 8-ounce baking dish.
  • Refrigerate for at least 3 hours, until completely cooled.
  • Just before serving, use a hand mixer or stand mixer to whip two to three of the reserved egg whites with 1 teaspoon of sweetener and the cream of tartar. Beat until stiff peaks form.
  • Spoon or pipe beaten egg whites onto the top of the lemon curd.
  • Place under a low broiler until meringue is browned. Watch carefully, as this goes very quickly!
  • Serve immediately, or hide in the schoolroom and eat both servings yourself.

If you’re strictly carnivore (and I typically am, but I can get away with some lemon juice and sweetener, so why not?), you can make a savory version by leaving out the plant stuff and adding just salt, whatever seasonings you tolerate, and a tablespoon or so of chicken broth. It tastes like little more than eggs and butter, but the texture is a very different experience. I quite like it.